- Aktifkan xampp anda terlebih dahulu. Tekan tombol window pada keyboard anda, lalu ketik xampp .
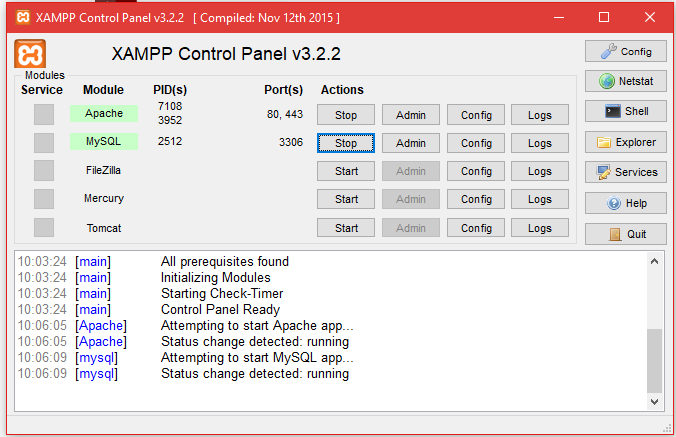
2. Klik Start pada Apache serta MySQL
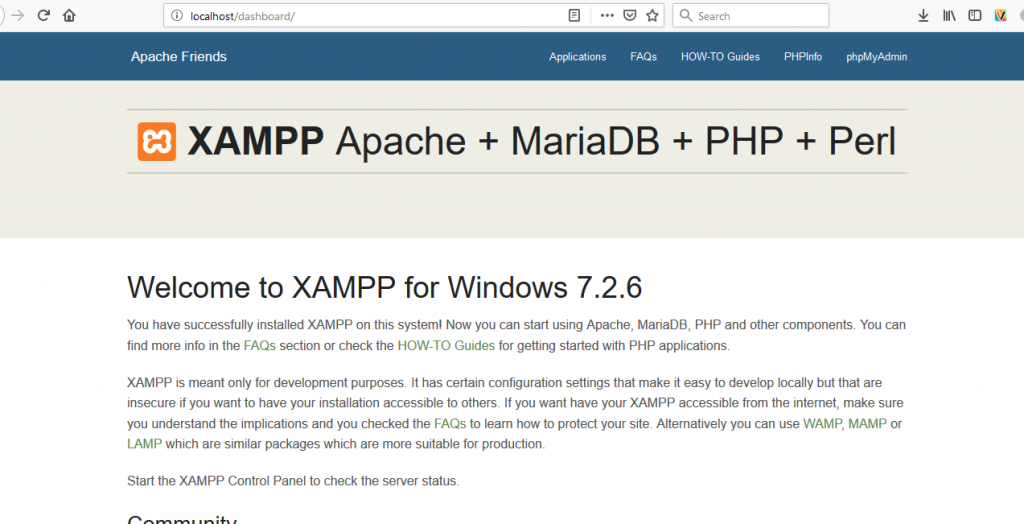
3. Kemudian buka salah satu Web Browser Anda Google Chrome, Mozilla, dll. Lalu ketik http://localhost/dashboard/ pada link URL anda.
4. Kemudian buatlah sebuah folder dengan nama sip-native dalam directory htdocs anda , secara default ada di C:\xampp2\htdocs 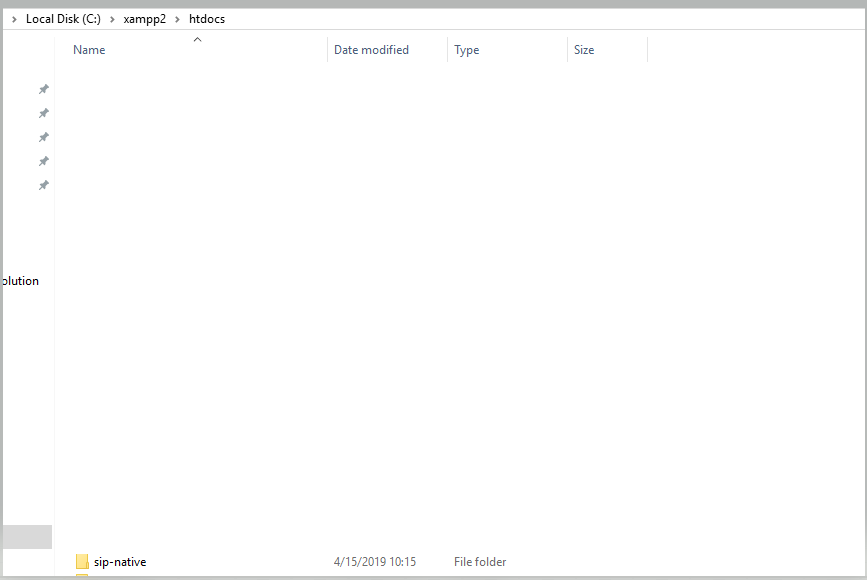 6. Sekarang kita download Admin LTE template di https://github.com/almasaeed2010/AdminLTE/releases . Scroll ke bawah, seperti gambar dibawah, lalu pilih Source code (zip) .
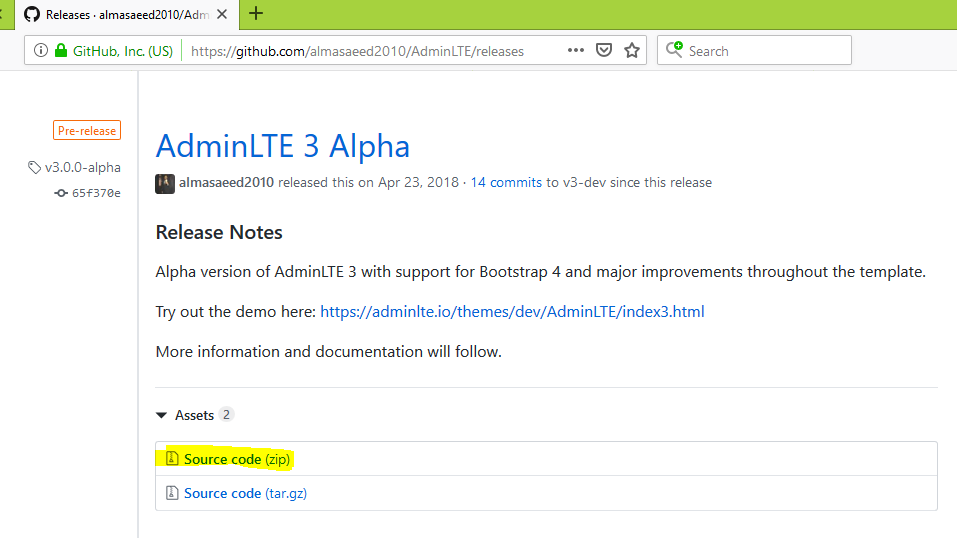
7. Setelah file berhasil di download, extract file tersebut.

8. Kemudian copy folder AdminLTE-3.0.0-alpha ke dalam folder C:\xampp2\htdocs\sip-native .

9. Lalu rename folder AdminLTE-3.0.0-alpha menjadi lte.
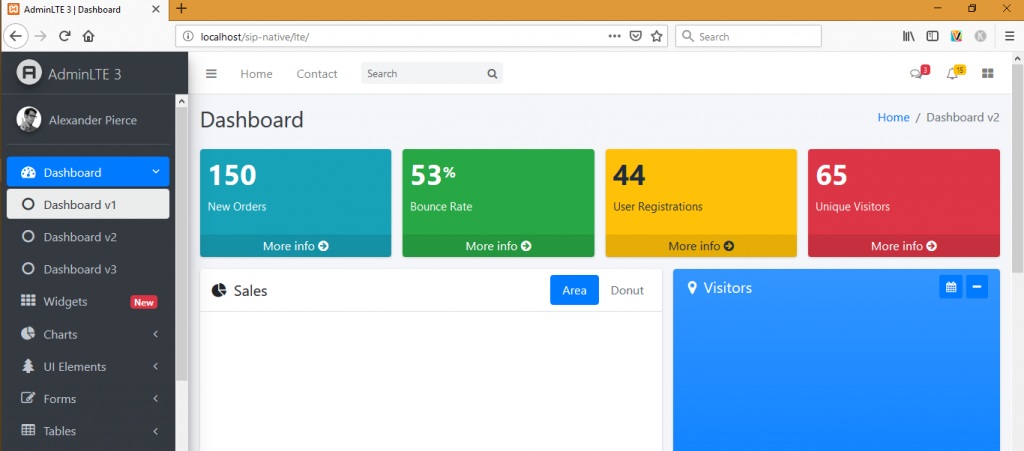
10. Sekarang buka salah satu Web Browser Anda Google Chrome, Mozilla, dll. Lalu ketik http://localhost/sip-native/lte pada link URL anda.
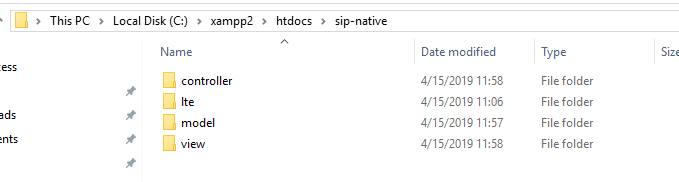
11. tambahkan 3 folder baru di dalam direktori C:\xampp2\htdocs\sip-native .
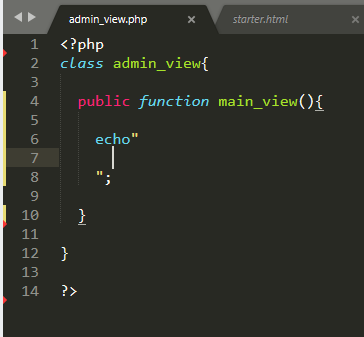
12. Sekarang buat sebuah file admin_view.php di dalam C:\xampp2\htdocs\sip-native\view , kemudian buatlah class dengan fungsi seperti gambar dibawah .

13. kemudian copy isi dari starter.html yang ada dalam folder lte ke dalam file admin_view.php didalam echo “<disini> “. buka link berikut https://pastebin.com/WuEUrRC2
14. Kemudian isikan code di bawah pada file index.php .
<!DOCTYPE html>
<!–
This is a starter template page. Use this page to start your new project from
scratch. This page gets rid of all links and provides the needed markup only.
–>
<html lang=”en”>
<head>
<meta charset=”utf-8″>
<meta name=”viewport” content=”width=device-width, initial-scale=1″>
<meta http-equiv=”x-ua-compatible” content=”ie=edge”>
<title>AdminLTE 3 | Starter</title>
<!– Font Awesome Icons –>
<link rel=”stylesheet” href=”lte/plugins/font-awesome/css/font-awesome.min.css”>
<!– Theme style –>
<link rel=”stylesheet” href=”lte/dist/css/adminlte.min.css”>
<!– Google Font: Source Sans Pro –>
<link href=”https://fonts.googleapis.com/css?family=Source+Sans+Pro:300,400,400i,700″ rel=”stylesheet”>
</head>
<body class=”hold-transition sidebar-mini”>
<div class=”wrapper”>
<?php
include(“view/admin_view.php”);
$index=new admin_view();
$index->main_view();
?>
</div>
<!– ./wrapper –>
<!– REQUIRED SCRIPTS –>
<!– jQuery –>
<script src=”lte/plugins/jquery/jquery.min.js”></script>
<!– Bootstrap 4 –>
<script src=”lte/plugins/bootstrap/js/bootstrap.bundle.min.js”></script>
<!– AdminLTE App –>
<script src=”lte/dist/js/adminlte.min.js”></script>
</body>
</html>
15. Sekarang buka salah satu Web Browser Anda Google Chrome, Mozilla, dll. Lalu ketik http://localhost/sip-native/ pada link URL anda.

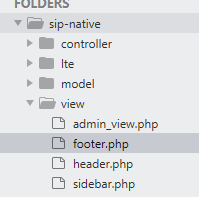
16. kemudian kita pisahkan header, footer, sidebar dengan cara membuat 3 file seperti gambar di bawah
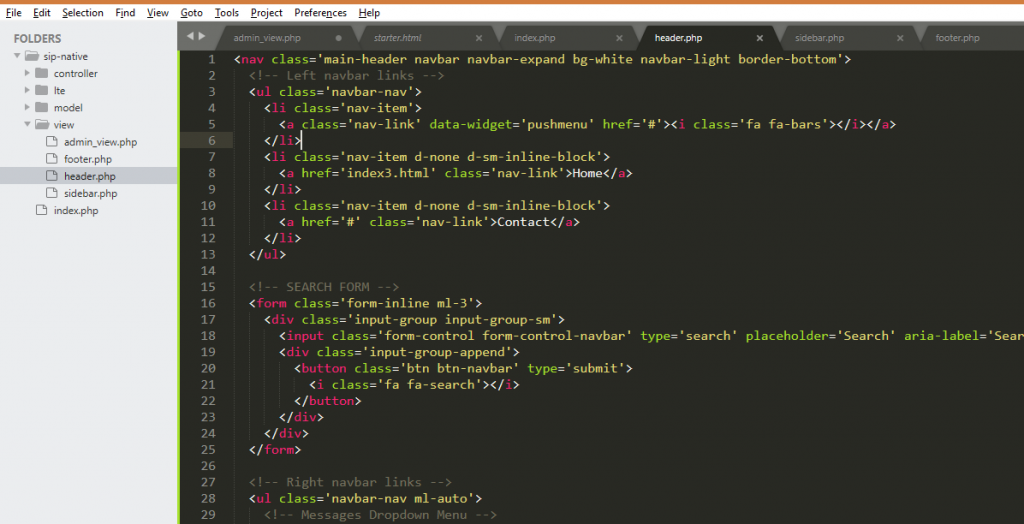
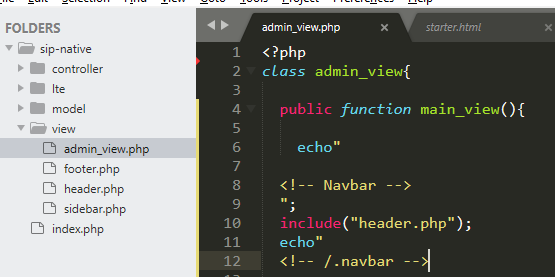
17. sekarang pisahkan bagian header yang ada di fungsi main_view ( ) ke dalam file header.php . Cari tag <!– Navbar –>

18. Untuk memanggil file nya, gunakan include , lakukan cara yang sama untuk sidebar dan footer
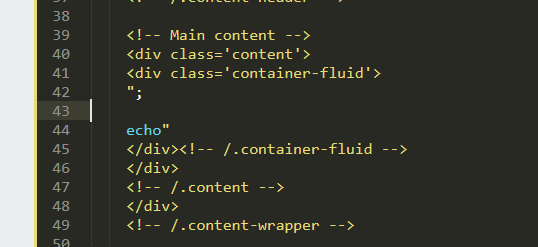
19. Sekarang jadikan main content seperti gambar berikut
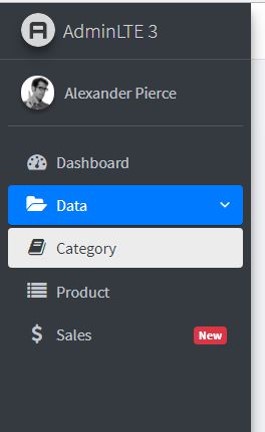
20. Kemudian buat menu seperti gambar berikut
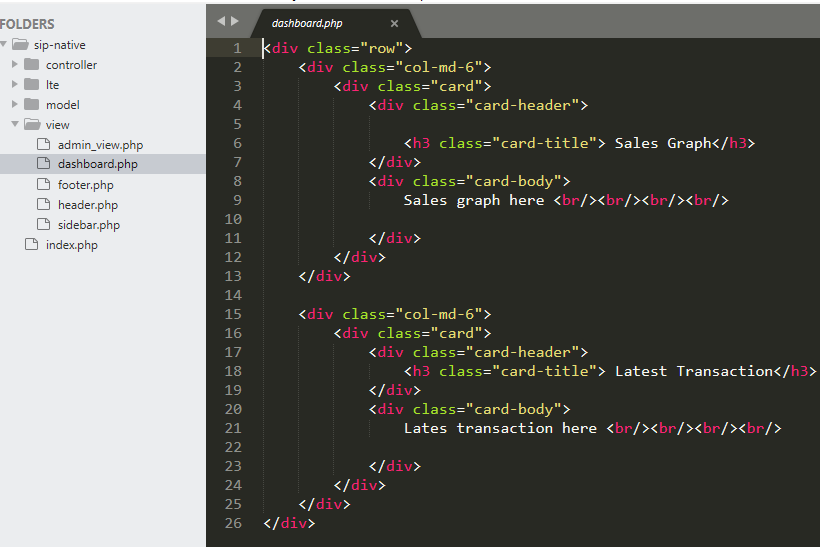
21. Sekarang buatlah sebuah file dengan nama dashboard.php dalam folder view .kemudian isi kode di bawah ini
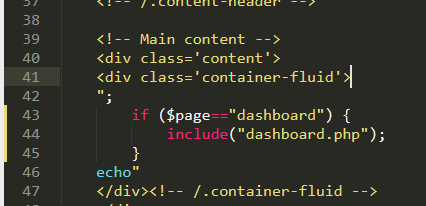
22. Sekarang kita coba panggil dashboard.php pada main_view, tambahkan parameter $page
![]()
23. Sekarang buatlah sebuah file dalam folder controller dengan nama DashboardController.php . Kemudian isi code seperti gambar di bawah
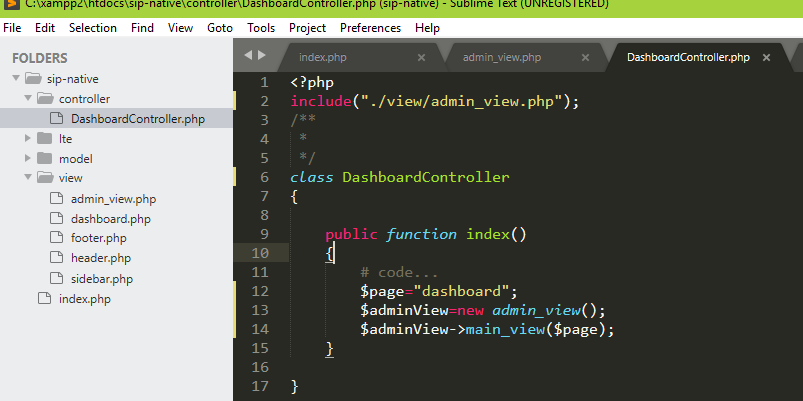
24. Lalu ubah code pada index.php seperti gambar di bawah.

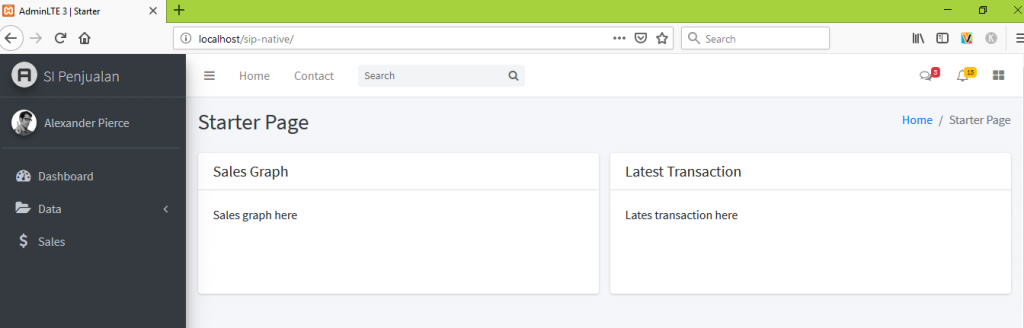
25. Sekarang buka salah satu Web Browser Anda Google Chrome, Mozilla, dll. Lalu ketik http://localhost/sip-native/ pada link URL anda.
26. Arahkan url link pada dashborad menu anda , ke halaman index.

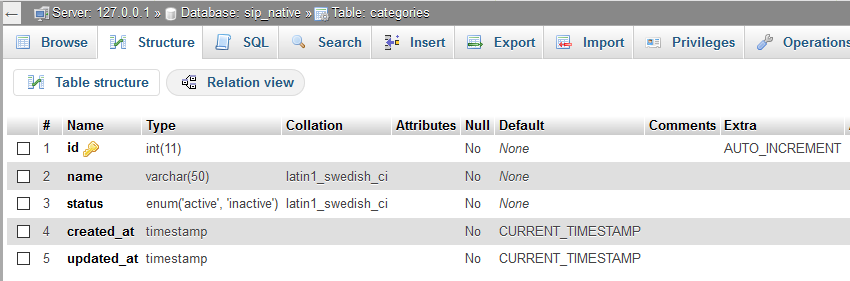
27. Okey, sekarang kita akan membuat database dengan nama sip_native

28 buatlah sebuah tabel dengan nama categories
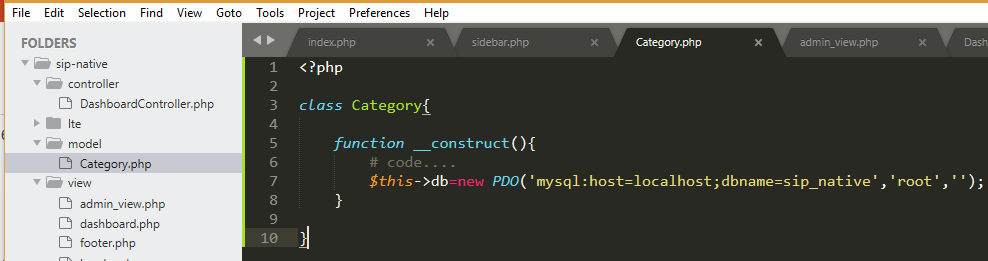
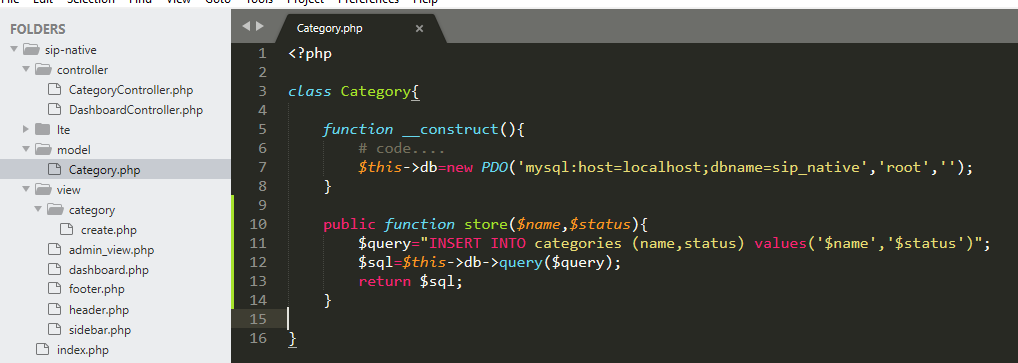
29. sekarang kita buat file baru Category.php dalam folder Model
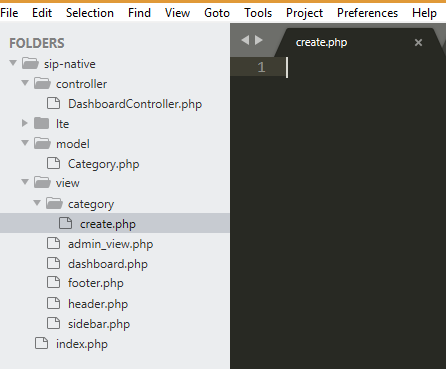
30. buatlah sebuah folder dengan nama category dalam view . Lalu, buat file dengan nama create.php.
31. Masukkan code berikut ke dalam create.php
 <div class="row">
        <div class="col-12">
            <form method="POST" action="">
                {{ csrf_field() }}
                <div class="card">
                    <div class="card-header">
                        <h3 class="card-title">Add Category</h3>
                    </div>
                    <div class="card-body">
                        <div class="form-group">
                            <label for="name">Category</label>
                            <input type="text" name="name" class="form-control" placeholder="Enter category" />
                        </div>
                        <div class="form-group">
                            <label for="status">Status</label>
                            <select name="status" class="form-control">
                                <option value="active">Active</option>
                                <option value="inactive">Inactive</option>
                            </select>
                        </div>
                    </div>
                    <div class="card-footer">
                        <a href="/sip-native/category/create" class="btn btn-outline-info">Back</a>
                        <button type="submit" class="btn btn-primary pull-right">Add Category</button>
                    </div>
                </div>
            </form>
        </div>
</div>
32. Sekarang buat file CategoryController.php dalam folder controller
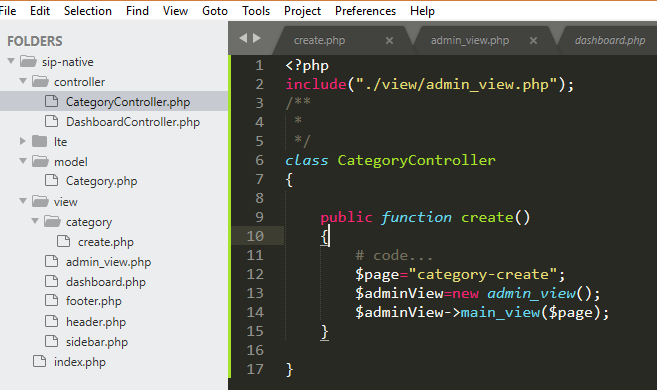
33. lalu tambahkan code ini dalam fungsi main_view
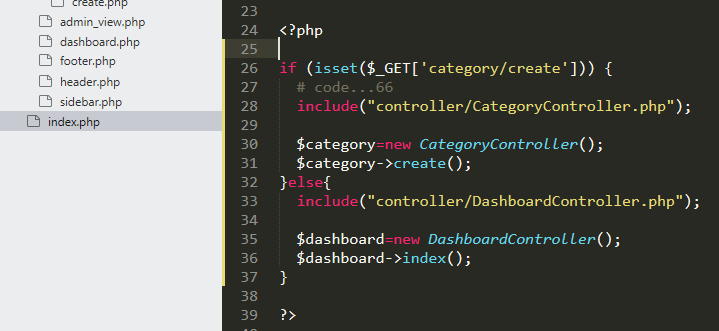
34. Selanjutnya ubah index.php
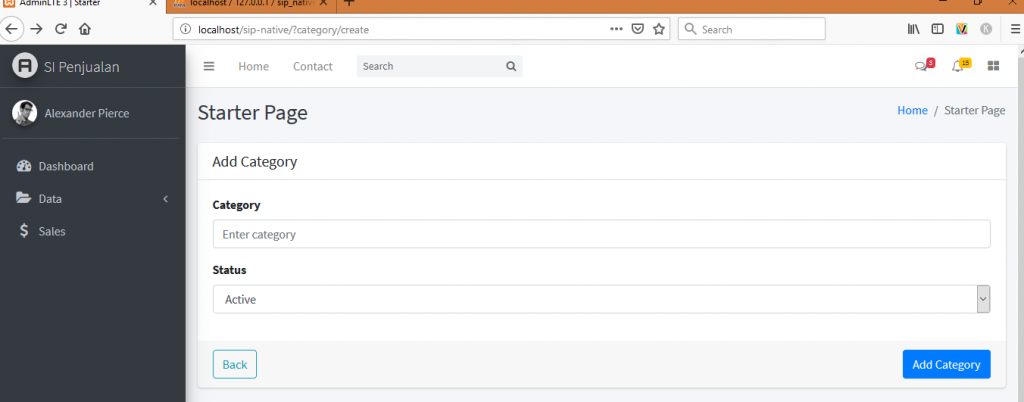
35. Sekarang buka salah satu Web Browser Anda Google Chrome, Mozilla, dll. Lalu ketik http://localhost/sip-native/?category/create pada link URL anda.
36. Pada Category.php , buat method store untuk menyimpan ke database
37. Pada CategoryController.php , buat method store untuk menyimpan ke database
<?php
include("./view/admin_view.php");
include("./model/Category.php");

/**
 *
 */
class CategoryController
{

	public function create()
	{
		# code...
		$page="category-create";
		$adminView=new admin_view();
		$adminView->main_view($page);
	}


	public function store($name,$status)
	{
		# code...
		$category=new Category();
		$category->store($name,$status);

	}

}
38. Tambahkan action pada create.php di folder category

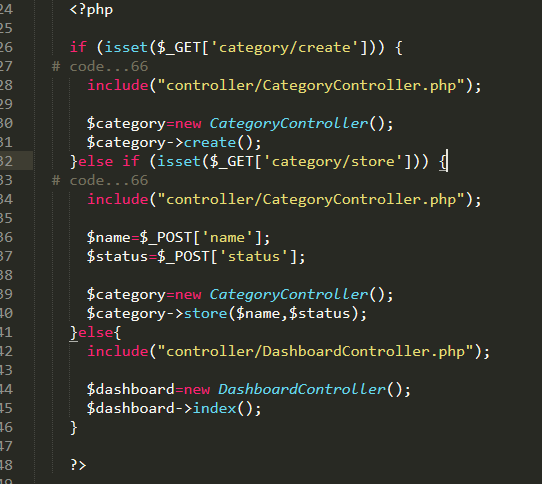
39. ubah code pada index.php
40. sekarang coba input data menggunakan form create category, lalu cek di database anda.
41. Sekarang buatlah file index.php di dalam folder category , masukkan code berikut
<div class="row">
        <div class="col-12">
            <div class="card">
                <div class="card-header">
                    <h3 class="card-title">Categories</h3>
                </div>
                <div class="card-body">
                    <?php if (!empty($_SESSION['message'])) {
                        # code...
                     ?>
                    <div id="alert-msg" class="alert alert-success alert-dismissible">
                        <button type="button" class="close" data-dismiss="alert" aria-hidden="true">×</button>

                        <?php echo"".$_SESSION['message']; ?>
                    </div>
                    <?php  }?>

                    <table class="table table-bordered table-hover">
                        <thead>
                            <tr class="text-center">
                                <th>ID</th>
                                <th>Name</th>
                                <th>Status</th>
                                <th>Action</th>
                            </tr>
                        </thead>
                        <?php $data=$_SESSION['data']; ?>
                        <tbody>
                            <?php while ($category=$data->fetch(PDO::FETCH_OBJ)) { ?>
                            <tr>
                                <td class="text-center"><?php echo "".$category->id; ?></td>
                                <td><?php echo "".$category->name ?></td>
                                <td class="text-center"><?php echo "".ucfirst($category->status) ?></td>
                                <td class="text-center">
                                    <form method="POST" action="">
                                        <input type="hidden" name="_method" value="DELETE" />
                                        <div class="btn-group">
                                            <a class="btn btn-info" href=""><i class="fa fa-eye"></i></a>
                                            <a class="btn btn-success" href=""><i class="fa fa-pencil"></i></a>
                                            <button type="submit" class="btn btn-danger"><i class="fa fa-trash"></i></button>
                                        </div>
                                    </form>
                                </td>
                            </tr>
                            <?php } ?>
                        </tbody>
                    </table>
                </div>
            </div>
        </div>
    </div>
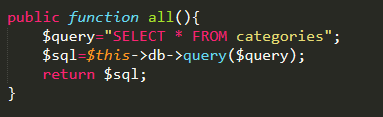
42. Tambahkan method baru all di dalam Category.php
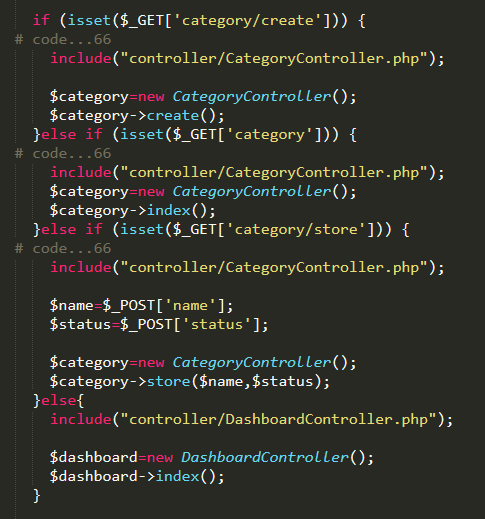
43. Tambahkan method baru index di dalam CategoryController.php
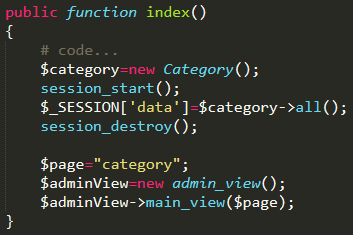
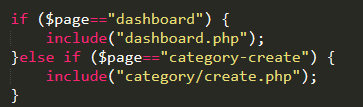
44. Pada fungsi main_view , tambahkan code dibawah
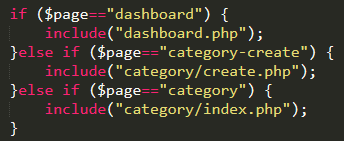
45. pada index.php
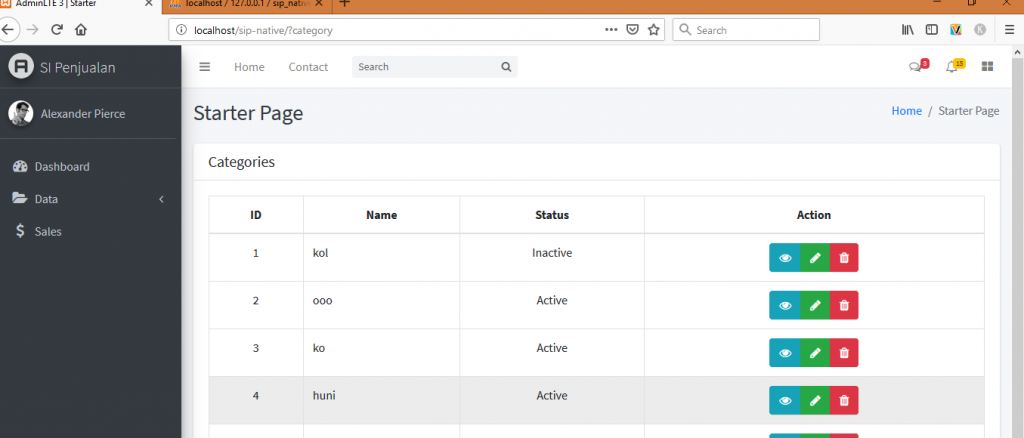
46. Sekarang buka salah satu Web Browser Anda Google Chrome, Mozilla, dll. Lalu ketik http://localhost/sip-native/?category pada link URL anda.