Tutorial mengenal dan memahami stack widget di flutter. Stack Widget merupakan widget yang memungkinkan kita untuk memasang beberapa lapis widget di layar.
Widget ini mengambil banyak anak dan memesannya dari bawah ke atas.
Jadi, item pertama adalah yang paling bawah dan yang terakhir adalah yang paling atas.
Contoh:
 Stack(
  children: <Widget>[
    Bottom(),
    Middle(),
    Top(),
  ],
),
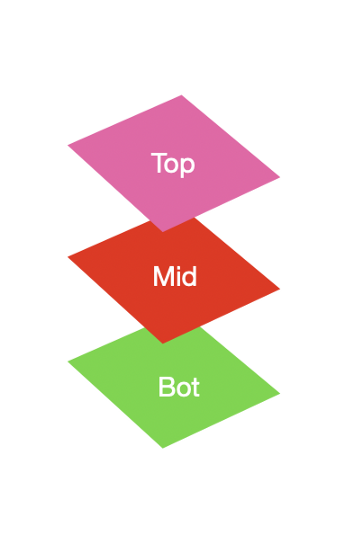
Untuk lebih jelasnya, coba lihat gambar di bawah ini:

Dari gambar di atas maka dapat disimpulkan bahwa urutan kode program menempatkan top di urutan ke 3, sementara dalam hasilnya posisi top berada di atas.
Jadi apapun yang berada di akhir children Stack, maka akan tampil di paling atas.
Contoh Kode:
 import 'package:flutter/material.dart';

class StackExample extends StatelessWidget {
  @override
  Widget build(BuildContext context) {
    return Container(
      color: Colors.white,
      child: Stack(
        children: <Widget>[
          Container(
            width: 300,
            height: 300,
            color: Colors.blue[200],
          ),
          Container(
            width: 200,
            height: 200,
            color: Colors.red[200],
          ),
          Container(
            width: 100,
            height: 100,
            color: Colors.yellow[200],
          )
        ],
      ),
    );
  }
}
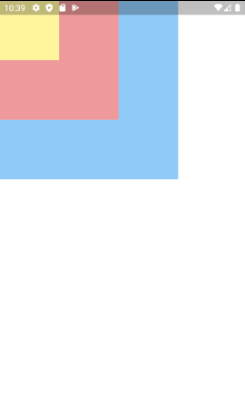
Hasilnya:

Praktik Menggunakan Stack Widget
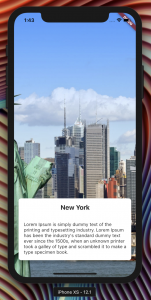
Ini adalah contoh bagaimana kita menggunakan stack widget untuk membuat tampilan semakin menarik. Berikut contoh hasilnya:

Mari kita membuatnya:
Step #1 – Buat Stack
Stack(
  children: <Widget>[

  ],
)
Step #2 – Tambahkan Sebuah Background
Container(
  decoration: BoxDecoration(
    image: DecorationImage(
      image: AssetImage('images/new_york.jpg'),
      fit: BoxFit.fitHeight,
    ),
  ),
),
Step #3 – Tambahkan Card widget dan Detail
Card(
  elevation: 8.0,
  shape: RoundedRectangleBorder(
    borderRadius: BorderRadius.circular(8.0),
  ),
  child: Column(
    children: <Widget>[
      Padding(
        padding: const EdgeInsets.all(16.0),
        child: Text(
          "New York",
          style: TextStyle(
            fontSize: 20.0,
            fontWeight: FontWeight.bold,
          ),
        ),
      ),
      Padding(
        padding: const EdgeInsets.all(16.0),
        child: Text(
            "Lorem Ipsum is simply dummy text of the printing and typesetting industry. Lorem Ipsum has been the industry's standard dummy text ever since the 1500s, when an unknown printer took a galley of type and scrambled it to make a type specimen book."),
      ),
    ],
  ),
),
Step #4 – Atur posisi Card
Positioned(
  bottom: 48.0,
  left: 10.0,
  right: 10.0,
  child: Card(
    elevation: 8.0,
    shape: RoundedRectangleBorder(
      borderRadius: BorderRadius.circular(8.0),
    ),
    child: Column(
      children: <Widget>[
        Padding(
          padding: const EdgeInsets.all(16.0),
          child: Text(
            "New York",
            style: TextStyle(
              fontSize: 20.0,
              fontWeight: FontWeight.bold,
            ),
          ),
        ),
        Padding(
          padding: const EdgeInsets.all(16.0),
          child: Text(
              "Lorem Ipsum is simply dummy text of the printing and typesetting industry. Lorem Ipsum has been the industry's standard dummy text ever since the 1500s, when an unknown printer took a galley of type and scrambled it to make a type specimen book."),
        ),
      ],
    ),
  ),
),
Final Code:
import 'package:flutter/material.dart';

class Stack2 extends StatelessWidget {
  @override
  Widget build(BuildContext context) {
    return Scaffold(
      body: Stack(
        children: <Widget>[
          Container(
            decoration: BoxDecoration(
              image: DecorationImage(
                image: AssetImage('images/new_york.jpg'),
                fit: BoxFit.fitHeight,
              ),
            ),
          ),
          Positioned(
            bottom: 48.0,
            left: 10.0,
            right: 10.0,
            child: Card(
              elevation: 8.0,
              shape: RoundedRectangleBorder(
                borderRadius: BorderRadius.circular(8.0),
              ),
              child: Column(
                children: <Widget>[
                  Padding(
                    padding: const EdgeInsets.all(16.0),
                    child: Text(
                      "New York",
                      style: TextStyle(
                        fontSize: 20.0,
                        fontWeight: FontWeight.bold,
                      ),
                    ),
                  ),
                  Padding(
                    padding: const EdgeInsets.all(16.0),
                    child: Text(
                        "Lorem Ipsum is simply dummy text of the printing and typesetting industry. Lorem Ipsum has been the industry's standard dummy text ever since the 1500s, when an unknown printer took a galley of type and scrambled it to make a type specimen book."),
                  ),
                ],
              ),
            ),
          ),
        ],
      ),
    );
  }
}
Kesimpulan
Banyak hal yang bisa kita eksplor dengan menggunakan Stack ini. Semangat terus buat berlatih dan cobalah untuk mengenal dan memahami stack widget ini lebih lanjut.
Semoga bermanfaat dan tetap terus belajar.

